
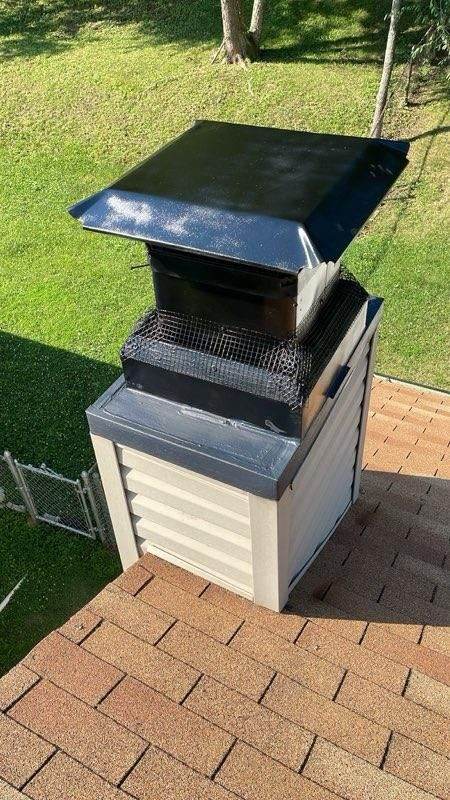
“The metal on top of the chimney” can describe several different components. On one home it may be a small cap fastened to a clay flue tile. On another it may be a large sheet-metal chase cover spanning the entire top of a framed enclosure. Some systems have both. A masonry chimney may instead have a concrete or mortar crown beneath one or more caps. Calling every one of these parts a cap makes leak conversations unnecessarily confusing.
The distinction matters because each component sheds water from a different place. A chimney cap installation does not automatically replace a failed crown, and a chimney chase cover does not correct roof flashing below. Before choosing a product, identify the chimney construction, document where water appears, and evaluate the assembly rather than shopping by a rooftop photograph alone.
On this page
- A chimney cap protects an opening
- A chase cover protects the top of an enclosure
- Many framed systems also have a chimney cap
- A masonry crown is a different component
- Roof flashing protects the lower intersection
- Factory-built components are system-specific
- Material choice is only one part of durability
- Rust stains are clues, not a complete diagnosis
- Screens and caps need the right relationship to the appliance
- Missouri weather tests every joint in the assembly
- What a useful top-of-chimney evaluation should document
- Choose the repair from the path, not the stain
- Frequently asked questions
A chimney cap protects an opening
A chimney cap is generally positioned over a flue or group of flues. Its roof sheds precipitation away from the open passage, while its supports preserve space for exhaust to leave. Many caps include screening intended to reduce entry by animals and larger debris. Some cover one clay tile; others are custom-built to cover multiple flues or a larger section of a masonry top.
The cap must suit the vented appliance and the termination. Size, height above the flue, screen configuration, attachment, metal, and wind exposure can affect performance and durability. A cap selected only because it fits the tile’s outside dimensions can still be unsuitable for the appliance or chimney system. Factory-built chimneys often require a listed termination component from the specified system rather than a generic masonry cap.
A missing or damaged cap can leave a flue more exposed to rain and animal entry, but not every leak comes directly down the opening. Water may cross cracked crown material, enter a masonry joint, pass failed flashing, or follow the outside of a pipe through a defective collar. If a salesperson declares “you need a cap” without identifying the entry path and existing construction, ask for a clearer explanation.
A chase cover protects the top of an enclosure
A chimney chase is a framed structure built around a factory-built chimney or vent. It may be finished with siding, stucco, brick veneer, or another exterior material, so it can resemble a solid masonry chimney from the ground. At the top, a metal chase cover spans the enclosure and allows one or more chimney sections to pass through properly formed openings.
The cover’s job is broader than that of a small flue cap. It has to shed water from the whole chase top. A well-designed cover is fabricated to fit, supported and sloped so water moves away, provided with formed edges, and integrated correctly around penetrations. The raised metal around a pipe opening is often called a collar; another storm-collar component may shed water around that junction, depending on the system design.
A chase cover is sometimes called a chase top or incorrectly called a pan. “Pan” can encourage the wrong mental picture: a flat tray that holds water. Ponding is a warning sign because standing water increases exposure at seams, fasteners, and low areas. From the ground, rust staining down the chase or siding can be a clue, but the top still requires safe evaluation.
Many framed systems also have a chimney cap
The choice is not always cap *or* chase cover. A factory-built chimney can pass through the chase cover and terminate with its own cap above. The chase cover sheds water from the enclosure; the termination cap protects the chimney opening and participates in the listed venting configuration. Replacing one does not make the other unnecessary.
This is also why terminology should be attached to photographs. Ask the service report to label the termination cap, storm collar if present, chase cover, chase cladding, roof flashing, and any observed seal or fastener condition. A close-up without context can make it difficult to tell whether the pictured metal belongs at the pipe, chase top, or roof.
Do not climb onto the roof to resolve the vocabulary. Use ground-level photographs or binoculars only from a safe location, and leave close inspection and measurement to equipped professionals. Roof pitch, moisture, overhead utilities, and fragile components create hazards that are not justified by a do-it-yourself identification exercise.
A masonry crown is a different component
A traditional masonry chimney usually ends in a crown or wash that covers the masonry top around the flue tiles. Its purpose is to direct water away from the chimney body while leaving the flues appropriately separated and terminated. A crown is not simply the last bed joint, and it is not the same as a metal cap over the flue.
Cracks, low spots, erosion, an inadequate edge, or separation around a flue can allow water into the masonry assembly. A new cap may reduce water entering through the flue opening but leave these paths unchanged. Conversely, chimney crown repair does not supply the functions of a missing termination cap.
Some masonry chimneys have a large custom metal cover spanning the entire top. Depending on its design and the system beneath it, people may call it a multi-flue cap, full-coverage cap, or metal crown. The name is less important than documenting what it covers, how exhaust exits, how it is attached, and how water is directed. Do not assume a large metal top automatically means the structure below is a framed chase.
Roof flashing protects the lower intersection
Flashing is located where the chimney or chase meets the roof. It manages water flowing down the roof and around the vertical structure. On masonry chimneys, a flashing assembly commonly involves base or step flashing and counterflashing integrated with the masonry and roofing. Framed chases require their own correctly integrated roof details.
A stain near a chimney does not identify whether water entered at the top or the roof intersection. Water can travel along framing, sheathing, pipes, or masonry before it becomes visible. Wind-driven rain may create a pattern that ordinary vertical rain does not. Roofing work can also change the flashing condition even when the cap and chase cover were never touched.
For that reason, comprehensive chimney leak repair begins with evidence. The visible interior endpoint, rainfall timing, attic observations when safely accessible, roof configuration, masonry or siding condition, and top components should be considered together. It may be necessary to coordinate chimney and roofing expertise rather than assigning every stain to the nearest piece of metal.
Factory-built components are system-specific
Factory-built chimneys are assemblies tested and installed with specified parts. A termination that appears interchangeable may differ in required air space, locking method, materials, or rain-management design. The model label, installation manual, and visible component markings help identify what belongs there.
DuraVent’s DuraChimney II information, for example, describes a specific factory-built chimney system and directs users to its own components and instructions. This is useful as an illustration of manufacturer-specific design, not as evidence that a Missouri home contains that product. DuraVent DuraChimney II system information. Never mix parts from different systems based only on diameter or appearance.
If the original model cannot be identified, photograph safely accessible labels without removing panels. Share installation records and manuals if the prior owner left them. A qualified evaluation may need to determine whether components can be verified, repaired, or replaced under the manufacturer’s requirements. A custom sheet-metal shop can fabricate an excellent chase cover, but it cannot redesign a listed chimney termination outside the applicable system instructions.
Material choice is only one part of durability
Homeowners often compare galvanized steel, stainless steel, copper, and coated metals. Material matters, especially when an older cover has rusted, but design and installation matter with it. A premium metal fabricated flat enough to pond water, cut poorly around a collar, or fastened in a way that creates leak paths can still perform badly.
Galvanized steel can eventually lose protective coating and corrode, particularly at cut edges and chronically wet areas. Stainless steel is commonly selected for corrosion resistance, while copper offers distinctive appearance and durability in suitable designs. Metals expand and contract at different rates, and contact between dissimilar metals can create compatibility concerns. Fasteners, sealants, adjacent flashing, and chimney components should be selected as a system.
Ask a proposal to identify the material and approximate thickness or specification where relevant, the edge design, slope or reinforcement, collar construction, attachment method, and how existing chimney components will be handled. The answer should be more specific than “lifetime top.” Any warranty should be read as written, including who issued it, what it covers, maintenance requirements, exclusions, and whether labor is included. This article does not establish or imply a Chimney Prime warranty.
Rust stains are clues, not a complete diagnosis
Orange or brown streaks on siding or masonry often point toward corroding metal above, but the source can be a chase cover, cap, fastener, flashing, antenna attachment, or another component. Greenish runoff may occur around copper. White deposits on masonry can reflect moisture transporting soluble salts. None of these colors alone identifies the necessary repair.
Inside, water may show as a ceiling stain beside the chase, damp framing in an attic, rust inside a factory-built firebox, staining on the hearth, an odor, or peeling wall finish. Record whether it appears during wind-driven rain, prolonged rain, snowmelt, or days later. Mark the stain boundary lightly with a pencil and date photographs if doing so will not damage the finish. Do not open walls or enter an unsafe attic simply to track it.
Rust on a factory-built fireplace or chimney deserves prompt attention because metal components and clearances are part of the system. Do not sand, paint, seal, or cover deterioration before its extent and cause are evaluated. Cosmetic treatment can hide evidence without restoring a component’s intended performance.
Screens and caps need the right relationship to the appliance
Cap screening can help exclude animals and larger debris, and in some configurations it serves a spark-arresting function. It must still preserve the outlet area and remain compatible with the appliance and manufacturer’s instructions. Openings that are too restrictive, damaged mesh, ice, nest material, or accumulated deposits can interfere with exhaust.
A screen is not a maintenance-free barrier. From the ground, look for obvious displacement or debris without attempting rooftop cleaning. If performance changes or the cap appears obstructed, stop use and arrange evaluation. Never light a fire to clear an animal nest or melt ice at the termination.
The right cap also needs secure attachment without damaging the flue tile, crown, or listed chimney. Wind can loosen an unsuitable component. A multi-flue design has to maintain appropriate relationships among separate outlets. When multiple appliances terminate through one structure, the report should identify which cap and flue serve each one.
Missouri weather tests every joint in the assembly
Rainfall, wind, snow, ice, summer heat, and winter temperature swings expose chimney tops year-round. Water that reaches porous masonry can contribute to deterioration as cycles repeat; water held on a metal cover can work at seams and fasteners. The exact vulnerability depends on exposure, design, materials, and maintenance—not simply whether the home is in St. Louis or Kansas City.
After a severe storm, use a safe ground-level view to note a missing cap, lifted metal, storm debris, or a new stain. Compare with earlier photographs if available. Do not wait for the next heating season when active water is entering, and do not assume a dry week proves a repair occurred naturally. Intermittent leaks often depend on wind direction and rain intensity.
For masonry, use repair materials compatible with the existing units and mortar rather than a generic hard patch. The National Park Service’s guidance on historic masonry explains that incompatible, overly hard mortar can contribute to damage of surrounding brick; while a modern Missouri house may not be historic, the principle of matching repair material to the assembly is valuable. NPS guidance on repointing masonry.
What a useful top-of-chimney evaluation should document
The service professional should first identify whether the structure is masonry, framed, factory-built, or a combination. Documentation should show the overall top and closer views with location context. It should distinguish observed holes, corrosion, open seams, loose parts, failed joints, cracks, ponding, missing components, and unverified areas.
Measurements should be taken safely and accurately before custom fabrication. For a chase cover, that can include overall dimensions, pipe locations and sizes, collar needs, edge or skirt dimensions, and constraints created by siding or trim. For a cap, relevant flue dimensions, number of flues, spacing, appliance type, and system identification matter. The installer should also consider how the new component will be transported, attached, and serviced without damaging the roof or chimney.
Ask whether the proposal addresses only the named component or related damage as well. If water has deteriorated sheathing, framing, masonry, or a factory-built fireplace, replacing the top may stop further entry but not restore already damaged material. Conversely, do not accept a broad rebuild recommendation without documentation connecting each scope item to a condition.
Choose the repair from the path, not the stain
A sensible leak process forms a testable explanation: water is likely entering at this component, under these conditions, following this route, and producing this evidence. The proposed work should interrupt that path while remaining compatible with the chimney and roof. When the evidence is incomplete, staged work or further investigation may be more responsible than replacing every top component at once.
Keep before-and-after photographs, material information, manuals, fabrication details, and invoices. Observe the area during later rain without assuming that one shower tests every wind direction. If the stain grows or appears elsewhere, report the timing and photographs rather than applying interior paint over it.
For properties in the St. Louis and Kansas City, Missouri regions, the same decision framework applies: identify the construction, name the component accurately, trace the likely route, and select work that fits the actual system. That approach is more useful than debating “cap versus cover” before anyone knows what is on the roof.