
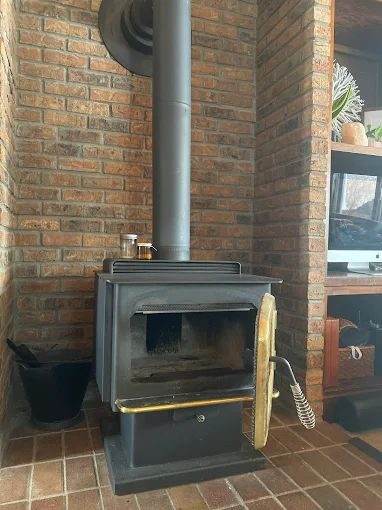
A wood stove is not furniture that can be positioned wherever it looks balanced. It is a listed solid-fuel appliance connected to a designed venting system and surrounded by defined clearance and floor-protection requirements. Stove output, chimney route, connector, walls, ceiling, hearth, fuel storage, household airflow, and service access must work together.
Professional wood stove installation begins with the exact appliance manual and room conditions. Do not buy a large stove first and expect smaller fires to make it appropriate. Selection and layout determine whether the finished system can be operated in its intended range.
On this page
- Choose output for the space
- Use the exact manual before final layout
- Plan floor and ember protection
- Favor a simple chimney route
- Existing masonry chimneys need evaluation
- Connector pipe remains visible and serviceable
- Consider combustion air and house pressure
- Termination and roof work need coordination
- Place the stove for daily use, not only appearance
- Permits and inspection are part of installation
- Fuel and maintenance planning starts now
- Commission the stove and teach the household
- Frequently asked questions
Choose output for the space
Discuss the heated area, ceiling height, insulation, windows, room connections, and whether the stove is occasional supplemental heat or frequent use. Published square-foot ranges are broad marketing guides, not substitutes for a heat-load discussion.
An oversized stove may overheat the room at a clean burn rate, encouraging the owner to restrict air and smolder. An undersized stove may be overfired in an attempt to meet demand. Both situations reduce satisfaction and can increase wear or deposits.
Consider minimum and maximum output, firebox size, burn strategy, and the manufacturer’s fuel guidance—not only peak output.
Use the exact manual before final layout
The listing label and manual specify clearances to combustible walls, corners, furniture, ceiling, connector, mantel-like shelves, and other materials. They also specify floor protection, allowed connector types, outside-air options, and chimney configurations.
Clearances can vary with rear or bottom heat shields and tested connector arrangements. Do not copy dimensions from a similar model or reduce them with a homemade shield. A permitted wall-protection system needs correct material, spacing, ventilation, and construction.
Keep the manual and label information with the home records. If the stove is used, confirm its identity and condition before planning around it.
Plan floor and ember protection
The hearth must meet the stove’s thermal and ember-protection requirements and extend the specified distance around loading and ash-removal areas. Tile over wood is not automatically adequate; underlying layers, thickness, joints, support, and thermal rating matter.
The floor must also support the combined stove, hearth, chimney support where applicable, and fuel-loading activity. Uneven or flexible floors can affect stability. Raised hearths change loading ergonomics and nearby clearances.
Do not place rugs, baskets, firewood, or pet beds inside required zones. Plan a practical noncombustible work area before decorating the room.
Favor a simple chimney route
A vertical interior route generally keeps more chimney warm and avoids unnecessary resistance. Exterior runs, long horizontal connectors, multiple elbows, and low exits can complicate draft and cleaning. The best route also avoids cutting structural members and preserves required clearances.
Factory-built chimney must be a compatible listed system from support through termination. Do not mix brands or series because nominal diameters match. Use specified ceiling supports, firestops, attic shields, roof flashing, storm collars, braces, and caps.
Ordinary duct, dryer vent, HVAC pipe, or single-wall connector is not a substitute for chimney through walls, ceilings, attics, or roofs.
Existing masonry chimneys need evaluation
An old chimney can sometimes serve a stove through an appropriately designed chimney liner installation, but age or previous use does not establish suitability. Inspect masonry, clearance, flue condition, size, height, offsets, crown, cap, and flashing.
The liner should match the stove outlet and manufacturer requirements, with insulation and connection appropriate to the listed system. An oversized clay flue can cool exhaust and draft poorly; a small passage can restrict flow.
DuraVent’s stainless-liner guidance instructs installers to match the appliance and approved configuration, illustrating why “a liner that fits” is incomplete design. DuraVent DuraFlex stainless guidance.
Connector pipe remains visible and serviceable
The connector between stove and chimney can be single- or double-wall only where permitted. Each has specified clearances, orientation, support, joints, length, and limits. It should rise and route according to the stove and connector instructions.
Do not pass connector pipe through a combustible wall or ceiling unless an approved transition system is designed for that application. Screws and joints must follow the component instructions; improvised tape is not structural or gas-tight assembly.
Provide access for inspection and cleaning. A beautiful enclosure that hides joints can create a maintenance problem and violate requirements.
Consider combustion air and house pressure
Kitchen hoods, dryers, bathroom fans, tight construction, and natural stack effect can compete with a stove. Some appliances allow or require an outside-air kit under certain conditions. That kit must use the specified components and route; a random wall hole is not equivalent.
Draft problems are not solved safely by leaving a window open as a permanent operating plan. If house pressure affects startup or smoke spillage, evaluate the complete home and venting system.
Never operate a stove that spills smoke. If a carbon-monoxide alarm activates, leave and call emergency services.
Termination and roof work need coordination
Chimney height and location relative to the roof and nearby structures affect termination. Exact requirements come from the chimney system, appliance, and adopted rules. Added height may require bracing. Snow, trees, and roof access influence maintenance but do not override required placement.
Roof flashing and storm-collar details must manage water without relying only on exposed caulk. Protect framing and insulation around the penetration. An attic shield should prevent insulation or stored material from contacting the chimney where required.
Plan the route with structural and roofing conditions before cutting any opening.
Place the stove for daily use, not only appearance
A stove can look centered in a room yet be awkward or unsafe to operate. Lay out the required clearance envelope first, then add the space a person needs to open the loading door, carry wood, use tools, remove ashes, and clean around the appliance without stepping backward into furniture or a stair. Door swing, side-loading access, hearth edges, and the path from exterior wood storage all affect the practical location.
Consider normal furniture placement and seasonal changes. A clearance zone cannot become a convenient spot for a basket, drying gloves, a wood rack, holiday décor, or a chair after installation. Keep combustible storage outside the distances required by the stove, connector, wall protection, and floor-protection instructions. A heat shield or noncombustible wall finish changes clearance only when it is an approved assembly used exactly as documented.
Future maintenance needs physical access too. The layout should allow inspection of connector joints, removal of baffles, tubes or a catalyst where applicable, gasket replacement, sweeping, and access to any blower or outside-air connection. Confirm whether the chimney will be cleaned from above or below and where debris will be contained. Photograph concealed shields, spacers, and support framing before close-up so their construction remains verifiable.
Finally, walk the intended fuel and ash routes. Wet logs carried across finished floors, hot embers moved through a narrow hallway, or ashes stored against the house create avoidable problems. Daily-use planning should be part of design, not discovered after the first fire.
Permits and inspection are part of installation
Missouri jurisdictions can differ. Verify current permit, inspection, and property requirements for the exact address. Identify who submits appliance, chimney, hearth, gas or electrical information and who closes the permit.
Insurance and HOA notification may also apply. Keep approved documents, model, serial, manuals, chimney components, photographs, and final inspection records. An installation should remain understandable to a future owner.
Fuel and maintenance planning starts now
Burn only permitted, properly dried fuel. EPA Burn Wise recommends wood at 20 percent moisture or less and avoiding smoldering fires. Test representative pieces on a freshly split face. EPA best wood-burning practices.
Store the main supply safely outside, off wet ground, with top protection and airflow. Keep only a modest amount indoors and outside clearance zones. Plan ash removal in a covered metal container outdoors away from structures after ashes cool.
Schedule inspection and condition-based cleaning. Use tools appropriate to the stove, connector, and chimney. A new system still accumulates deposits if fuel or operation is poor.
Commission the stove and teach the household
Initial break-in fires may be required for paint and refractory components. Follow the manual, ventilate as directed, and do not confuse expected curing odor with gas or smoke leakage. The installer should demonstrate controls, loading, reload, ash handling, overfire signs, and emergency shutdown.
Maintain smoke and CO alarms. Protect children and pets from hot surfaces. Never leave doors open beyond a specifically permitted startup or loading procedure, and never use liquid accelerants.